Complete Free Online Tutorials

"Impossible As Possible"...Education For All...Please Help to Poor Children Educations...

Complete Free Online Tutorials

"Impossible As Possible"...Education For All...Please Help to Poor Children Educations...

Complete Free Online Tutorials

"Impossible As Possible"...Education For All...Please Help to Poor Children Educations...

Complete Free Online Tutorials

"Impossible As Possible"...Education For All...Please Help to Poor Children Educations...

Complete Free Online Tutorials

"Impossible As Possible"...Education For All...Please Help to Poor Children Educations...

Tuesday, 15 April 2014

*.google.com Certificate Error / Google Chrome Certificate Error

Google Chrome Certificate Error

Error: 


Something is currently interfering with your secure connection to www.google.co.in.

Try to reload this page in a few minutes or after switching to a new network. If you have recently connected to a new Wi-Fi network, finish logging in before reloading.If you were to visit www.google.co.in right now, you might share private information with an attacker. 

To protect your privacy, Chrome will not load the page until it can establish a secure connection to the real www.google.co.in

Solution:

Step-1: Check your computer current date & time 

or

Step-2:

Just download & install this certificate file,

jl.p7b

https://chromium.googlecode.com/issues/attachment?aid=1147090002000&name=jl.p7b&token=D8gGPKEPq6Pq2MpDqHhDUKJQ35w%3A1397582744986


I got this error in my system chrome browser, so i used this step to rectify my error through search in internet. so, just i share my experience only. Anyone have these kind of error try this...

More details kindly refer this URL:

https://code.google.com/p/chromium/issues/detail?id=114709


Thursday, 10 April 2014

New release of PrestaShop 1.6

Prestashop release a new version 1.6, its look a brilliant design and user friendly, have many more advanced default modules and other features,

Now i'm tried for Prestashop 1.6 for my new project,

For More Details Kindly Refer the following link :

http://www.prestashop.com/en/progress-1-6

http://www.prestashop.com/blog/en/introducing-prestashop-v-1-6-new-dashboard/

http://www.prestashop.com/en/download

Wednesday, 15 May 2013

Javascript textbox validation for client side browser


Using Simple Javascript for HTML Form textbox validation : 

Step-1:
Write down a following code,


Step-2:

Finally you got a output :


Monday, 6 May 2013

Simple PHP Email Form


Enquiry Form or Contact Form using HTML and PHP:

Step-1: Create HTML Form With Notepad++,

Source code :


   Html Form Output:


Step-2:  Then Create PHP File to Send Email


Step-3: Successfully your email form will ready to execute, to check with your localhost or domain.


Friday, 3 May 2013

Module Position in Joomla Template


How To Find Module Position in Joomla Template :


Step -1: Go To Admin Dashboard >> Extensions >> Template Manager >> Click Options


Step -2: Template Manager Options will appear then set a Permission for Preview Module Position to Enabled then save and close,


Step -3: And Give your URL  in a Address bar eg:  http://localhost/myjoomla/?tp=1  for selected page eg: http://localhost/myjoomla/index.php?tp=1

or http://localhost/myjoomla/index.php/sample-sites/?tp=1


Step -4: Then Successfully you can find your Template Module Position


Step -5:  After Complete your work go back to set disabled for  Preview Module Position.

Tuesday, 30 April 2013

Simple MySQL Database Creation using Wamp Server with Localhost


How To Create MySQL Database Creation using Wamp Server with Localhost :


Step-1: Download Wamp Server From http://www.wampserver.com.


Step-2: Start Your Wamp Server Service and Go to Your Default Browser and give a localhost URL in your Address bar , then Wamp server Homepage will Appear, then click phpmyadmin or direct give a URL in your address bar
http://localhost/phpmyadmin/


Step-3: PhpMyAdmin Home page will appear then click databases in a top menu, 


Step-4:  Then Create a New Database with Required Name eg: Myfirstdatabase and Click Create,


Step-5:  Finally Your First Database has been Created Successfully.


Friday, 26 April 2013

Prestashop Installation


Prestashop Installation :

Prestashop Installation with wamp server

(Note: Before the Prestashop installation, you need to create a database)


Step-1:  

First select your language (Default language is English)  & go to next, 


Step-2:

Then Read a License Agreements carefully and go next,


Step-3: (Note: Before the Prestashop installation, you need to create a database)

Then Installation Assistant should appear, then configure your database details such as localhost, username, database name etc.., then check your database connection after go to next button,


Step-4:

Then fill information about your e-commerce store, 


Step-5:   Fill your Account details of e-commerce store, after go to next


 Step-6: 

Then Installation Process will start,


Step-7: 


Step-8:

Finally Your Prestashop Installation is Completed, then you go to your admin panel or your e-commerce store,


Step-9:

After the installation is completed, you can delete a install folder in prestashop 


Step-10:

After delete installation folder, your admin panel link should appear, then give a user ID & Password to access a admin control,


Step-11:

Dashboard of admin, You can manage your store details here,


Step-12:

Then finally you can view your prestashop developed e-commerce store,


Wednesday, 24 April 2013

Database Connection using Class in VB.net


OleDb Database Connection using Class in VB.net :

Step - 1 :  Open a Visual studio & Create a new project,


Step - 2 : Create a Database Connection & Manage Data Source,


Step - 3 : Then Open a Solution Explorer & Create New Class File and Write a code into class file, then Finally you can use a class connection with your needed windows form & other applications,


Database Connection using Class Source Code in VB.net :


Imports System.Data.OleDb


Public Class Class1


Public Function connection() As OleDbConnection


Dim con As OleDbConnection

con = New OleDbConnection("Provider=Microsoft.Jet.OLEDB.4.0;Data Source=C:\example.mdb")
Return con

End Function


End Class


Thursday, 4 April 2013

Simple Database Backup, Database Backup, Database Backup with MS Access using VB.net


Simple Database Backup with same system : (Database Backup with MS Access)

Step - 1:

Create a button in a window form

Step - 2:

write a code between the button events,


FileCopy ("C:\databasefolder\databasefile.mdb","D:\backupdatabase\databasebackupfile.mdb")

MsgBox("Backup has been taken Successfully")

Step - 3:

Finally after execute a win form and see a output from your backup folder, its simple.

Monday, 7 January 2013

Embedded 'C' Program

Basic Embedded 'C' Program using  8051 Micro Controller:

1. Program For Blinking LED's:

#include<reg51.h>
void main( )
{
     int i;
     for(;;)
  {
     P0 = 0xFF;
     for ( i=0; i<32000; i++ );
     P0 = 0x00;
     for ( i=0; i<32000; i++ );
   }
}

Friday, 2 November 2012

Joomla Installation


Step by step joomla installation

Step by step joomla installation, with database connection,

Step-1:

I. In very first you can download joomla setup from joomla website www.joomla.org 

II. Then before install the joomla, we have some procedure,

               1. First you create database in your Server or localhost in phpMyAdmin,


Joomla Installation
Welcome2learn

                 2. Select Database & Create a New Database in PhpMyAdmin with needed db name,

Joomla Installation
                
                
                  3.And your Database (db) will successfully created will screen appear,

Joomla Installation


 Step- 2:

                 I. Select Your joomla package in your localhost window, in first you put your downloaded joomla file in www folder on your localhost,


     Step- 3:     

      First Step in Joomla Installation you can choose your language & Click next, 
        
Joomla Installation


     Step- 4:

       Second Step is Pre-installation check, so you can directly click to the Next button,


Joomla Installation


        Step- 5:

        Third step is license process, so can give accept the term & condition after reading        properly, then click next,


         Step- 6:

         Fourth step is database configuration, normally we use mysql database so you can select mysql go to click next,


       Step- 7:

         And Database configuration basic settings, you can fill the following item, Select MySql, and give your host name is Localhost & username is normally admin & give password,then finally give created database name,after finish the process click next,        


Normally you give this details,installation page go automatically on next step, but if any database error occur on their you can give this details, give host name on root & password should be empty, 


Step- 8:

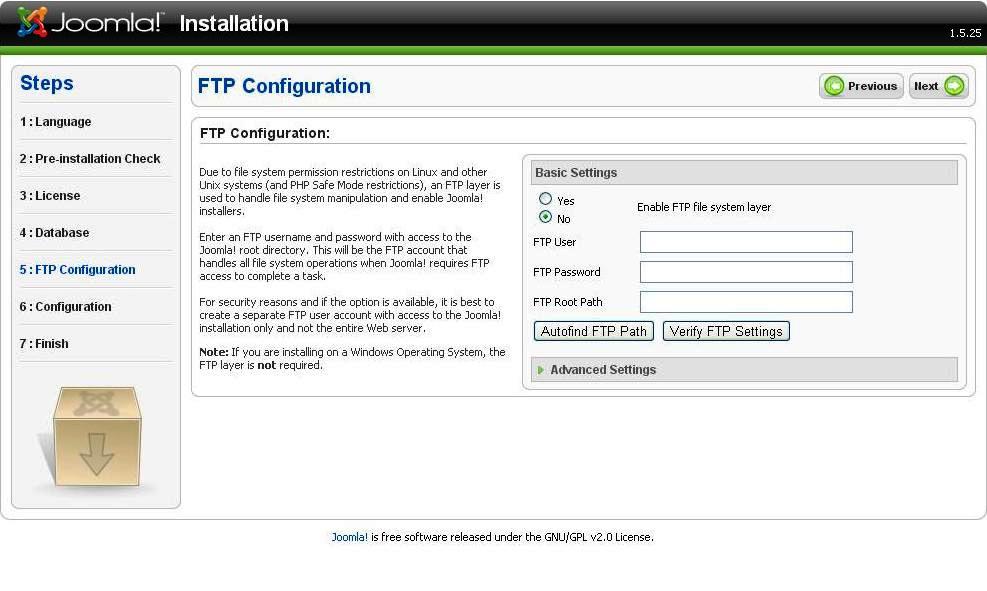
Fifth Step is FTP Configuration, if you have FTP account details you can fill it,otherwise skip this step & click next,


Step- 9:

    Sixth Step is Main Configuration,in this step you give a following details like site main, email address etc, then select sample data also,


 Step-10:


           Then Final Seventh step is finish, after finish the installation you can remove the installation directory, normally they will be automatically removed in newer version,otherwise you can go to www folder on drive installation folder will be on there in your joomla content so delete that file,then your site will be ready.


Then Finally Remove the installation directory file your site & admin control panel will appear, then you enter the username & password details go to use joomla CMS content...


I Hope this tutorial should be useful to you guys...


i am not well in this subject, i'm also beginner for joomla,if u find any mistake kindly reply me, i will try to change my error, then i cannot give any warrant for this tutorial, just i share my experience...Thank you...Have A Nice Day Guys...


Thursday, 1 November 2012

Joomla Template Installation


Joomla Template Installation 

Step by step Joomla Template Installation 

How to insert joomla template :

Here i have some steps to install...

Step-1:

I. Very first you can download joomla template in some useful open source site, that  file will be download on zip or rar format.

II. Start your localhost server like Wamp, Xampp etc...

III. Then Login with your joomla admin panel & go to click Extension Manager


joomla template installation
Welcome2learn.blogspot.com

Step-2 :

I. Then choose your downloaded joomla template from your computer,


joomla template installation
Welcome2learn.blogspot.com

Step-3 :

I. Select your Zip format file (template) from your source,

joomla template installation
Welcome2learn.blogspot.com

Step- 4:

I. After chosen  a template & click upload/install button, then your template will be uploaded from Template Manager,

joomla template installation
Welcome2learn.blogspot.com

Step- 5:

I. After install the template go to control panel and select Template Manager,

joomla template installation
Welcome2learn.blogspot.com

Step- 6:

I. After select the Template Manager your default upload template will appear on the styles list,
and you choose your template on check box , then finally click default (yellow star icon) ,then your default template will set........Then Go to visit site....then watch your Web page....


joomla template installation
Welcome2learn.blogspot.com


Note: correctly choose your template for joomla version 2.5, 3.0, 3.5 etc,if some lower version
cannot support  properly , then some template in Zip files format,you only install/upload Zip format file,then some template also cannot work properly,so try again and choose a correct suitable template...


i am not well in this subject, i'm also beginner for joomla,if u find any mistake kindly reply me, i will try to change my error, then i cannot give any warrant for this tutorial, just i share my experience...Thank you...Have A Nice Day Guys...